How to create a triggered message
Go to the “Triggered messages” section and click the "Create new message" button at the top right corner of the section.
💡 Content
Choose the type of triggered message you want to create:
Chat message
Pop-up
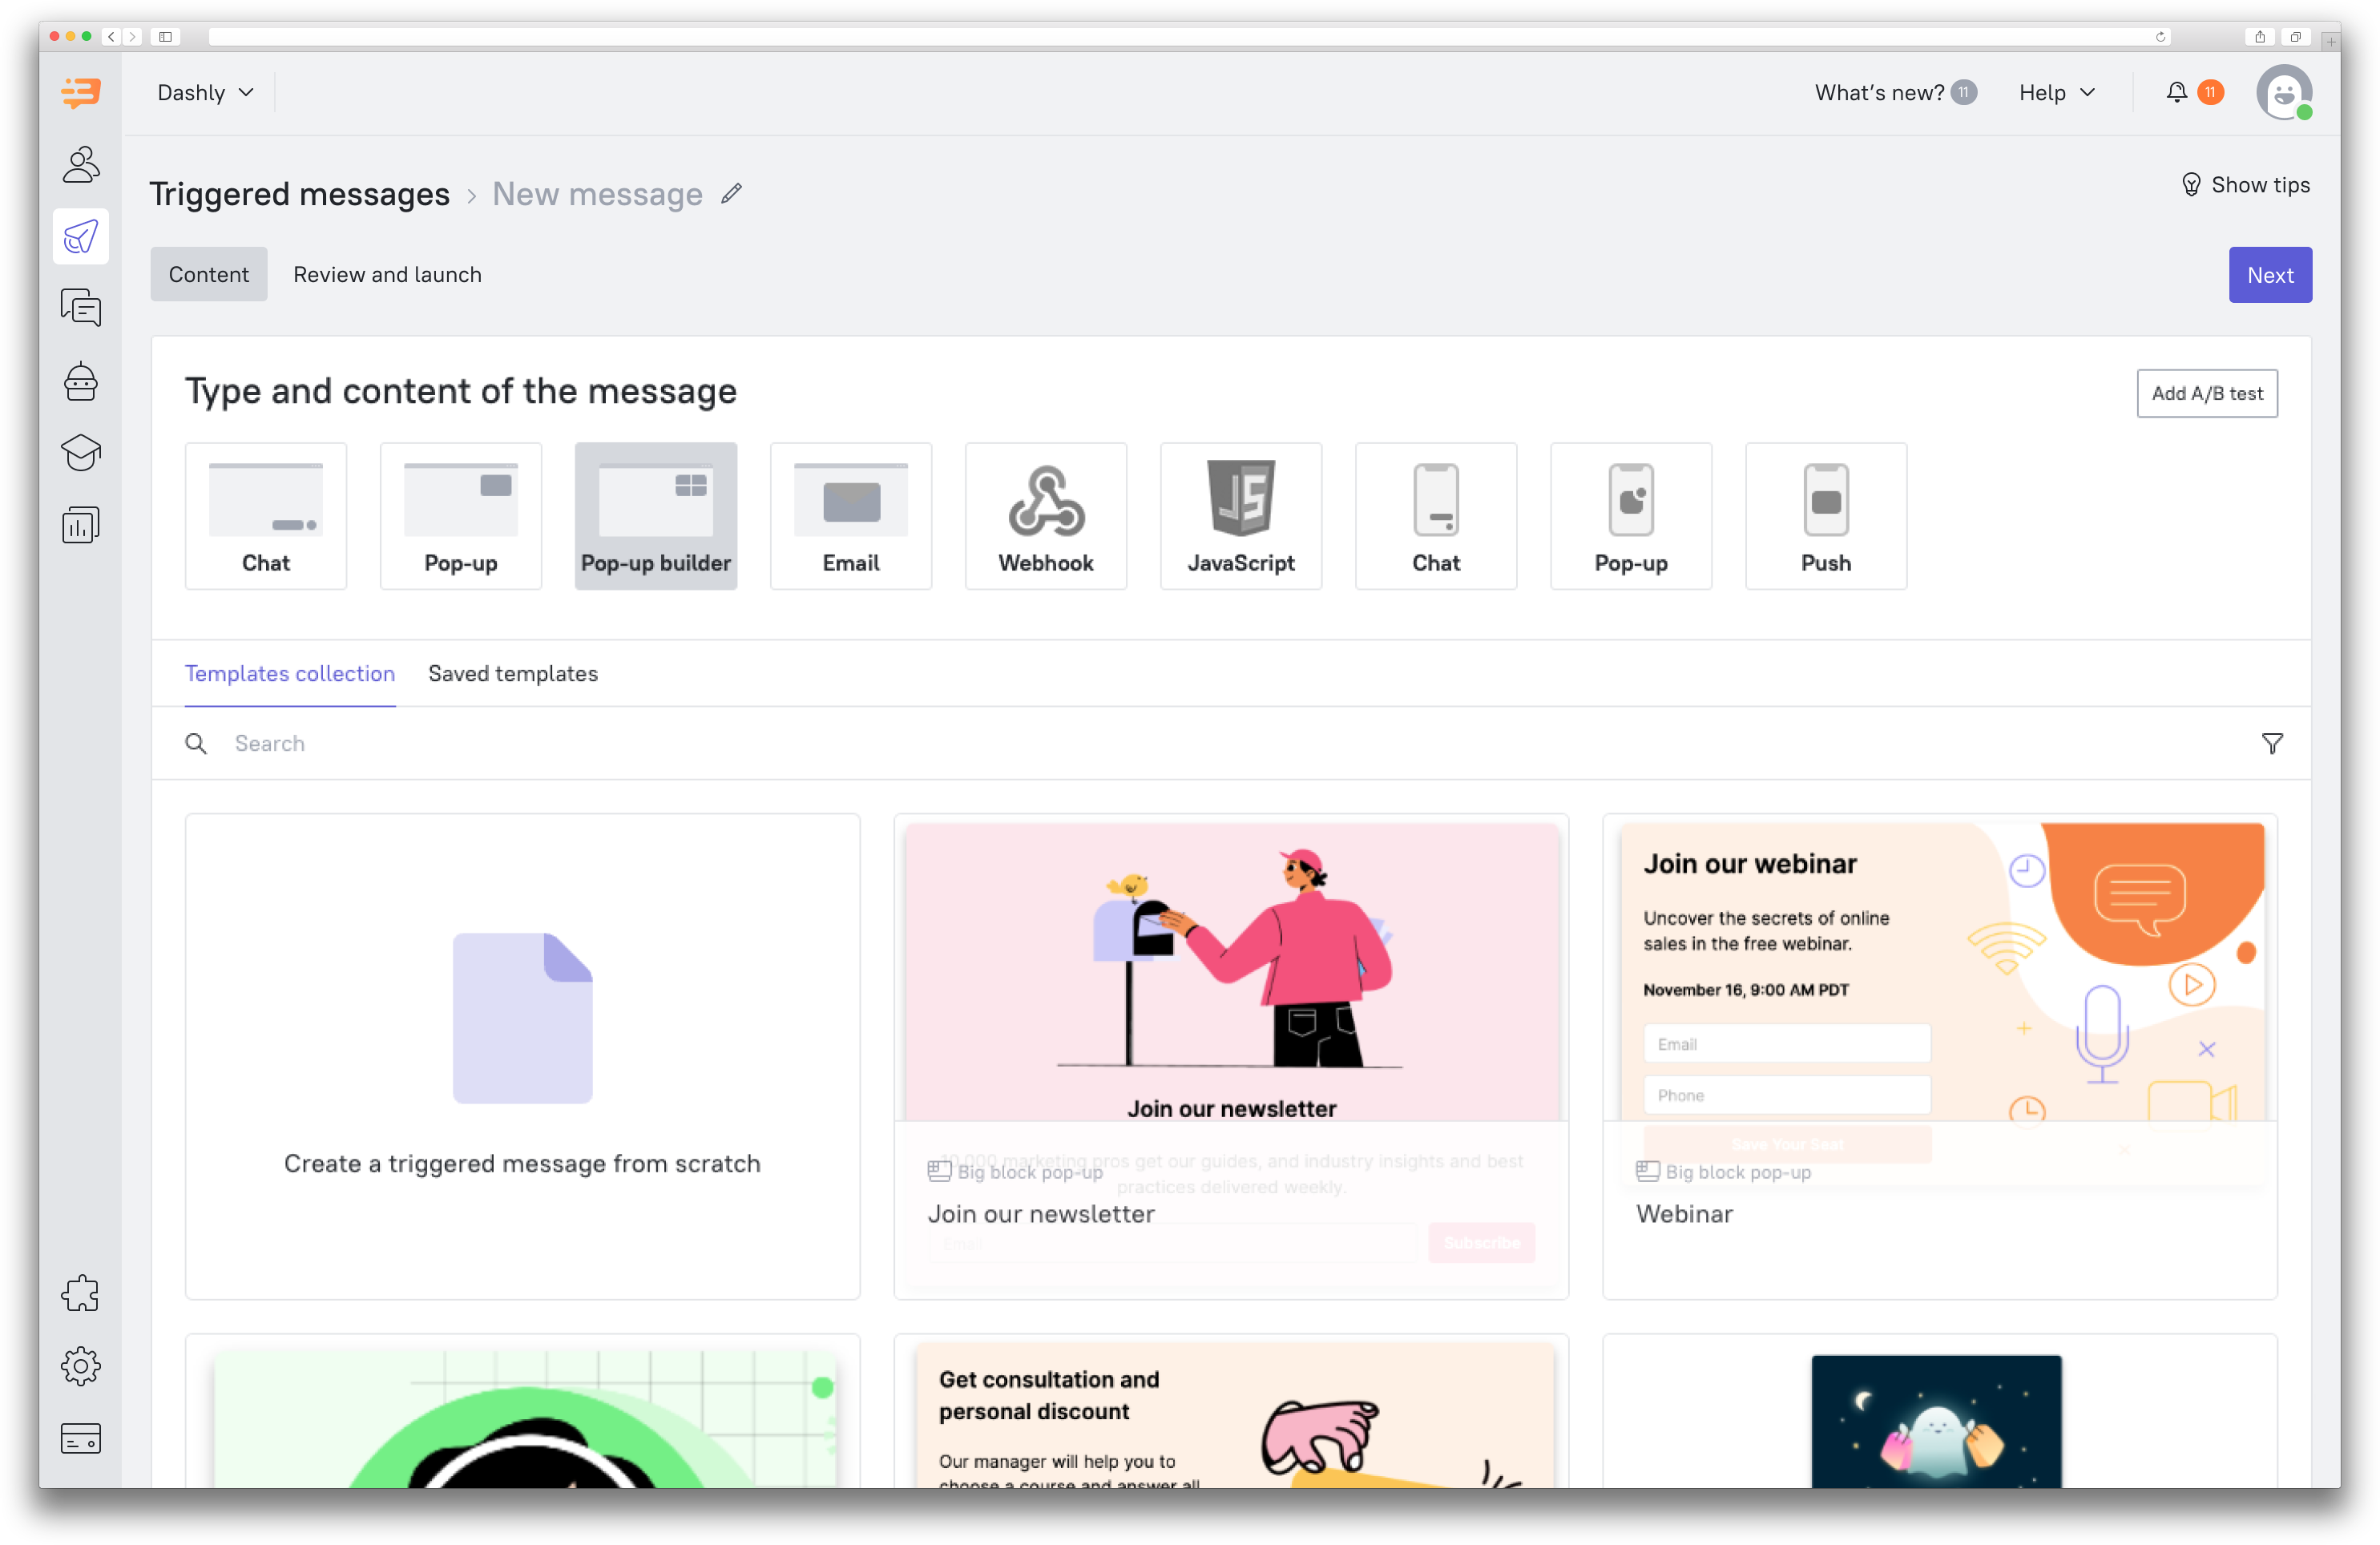
The first 4 types of triggered messages are basically default Dashly triggered message types you can send to your visitors/users, however, Webhooks and JavaScript are a bit more tricky, they can be used to implement extensive scenarios, sending data to other systems or tracking events on your website.
You can choose a template you like or create a design yourself ("Create a triggered message from scratch"). You can also save any triggered message as a template and use it later.
You can also add A/B test to your messages.
When you finished creating contents of the message, click Next.
💡 Conditions of sending
At this step, all the basic message settings are applied: you need to select a trigger, set up an audience, sending conditions, etc.
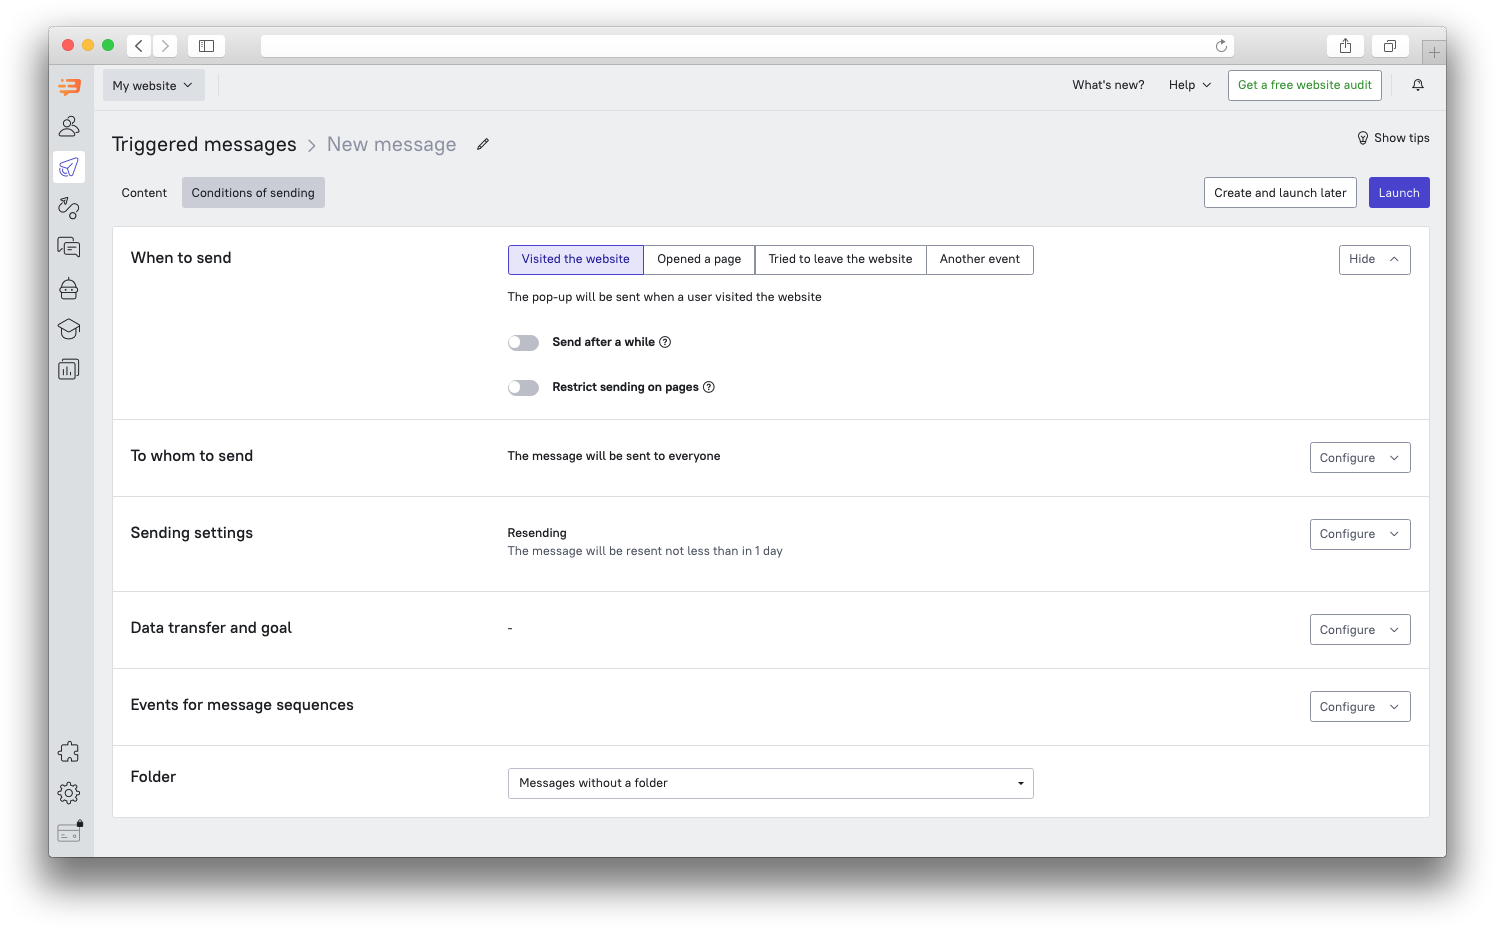
💡 When to send (trigger)
At this step, the message trigger is set. A trigger is any user action (event) used to initiate an triggered message sending.
Both standard events and custom events are available as triggers. Let's take a closer look at what each option means.
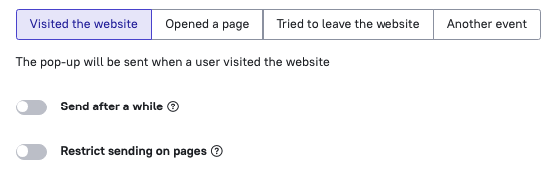
1. Visited the website. This event is recorded if the user visited the site for the first time or again, 40 minutes after the last visit. Read more about the event.
2. Opened a page. This trigger option should be selected if you need to send (or restrict sending) a message when visiting specific pages of the site or screens of your mobile app.
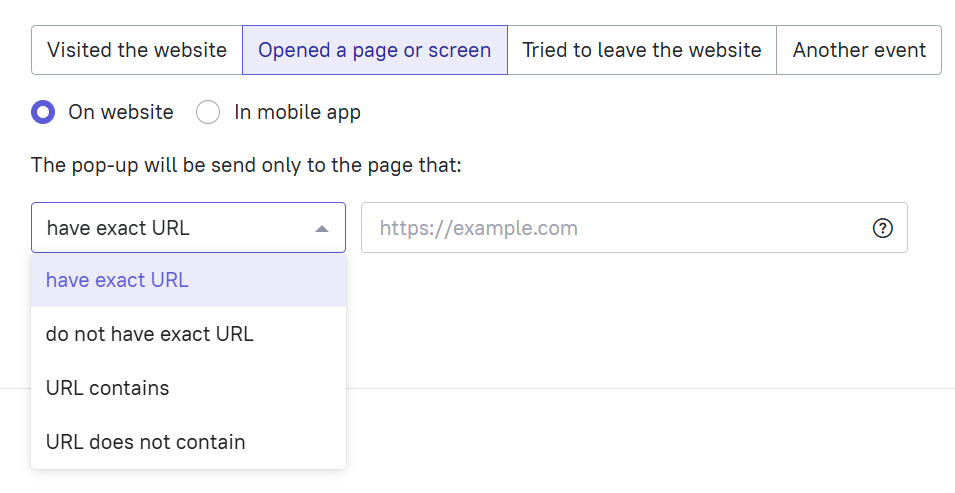
You can choose from several options for Opened a page / screen. You can trigger a message if:
the client opened a specific page - for example, exactly https://website.com/dashboard/landingpage
the client opened any page that doesn’t have this exact address - everywhere except for the page https://website.com/dashboard/landingpage
the address of the landing page contains specific data - for example, on all pages of the site that contain /blog/ in the address
the address of the landing page doesn’t contain specified data - everywhere except for pages with /blog/ in the address.
You can add multiple pages as a trigger and combine these conditions for more precise sending.
3. Tried to leave the site. This event is recorded when users move the cursor past the top border of your website. If you select this event as a trigger, you can use a message to draw the user's attention to the page. Read more about the event.
4. Another event. Here you can freely specify any event from those recorded in your project as a trigger. You can also specify several events at once, then the message will be sent after any of them is triggered, according to the OR principle.
💡You can send the message after some time with the "Send after a while" option:
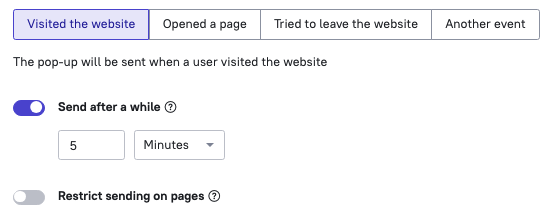
This will let you set a delay for sending messages to make sure users don't receive it immediately after opening a page / at the right time.
💡You can add the "Restrict sending on pages" condition to any trigger except for “Opened a page”:
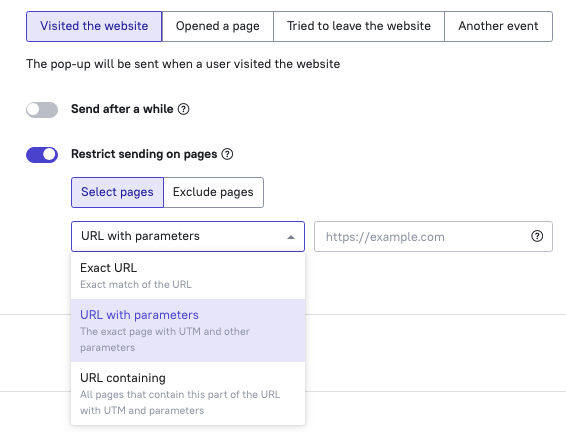
Exact URL match: this will limit sending only to pages with an exact address. All specified characters must be in the page address when you go to it. You can use * in this filter:
The asterisk (*) matches any number of characters (including -, _, —). You can use the asterisk (*) anywhere in the string.
For example, if you specify the address as https://mywebsite.com/*/page-1, the message will work on any pages where the part of the address before the asterisk contains https://mywebsite.com and ends with /page-1.
You can also hide dynamic address parameters behind the asterisk to send the message on all pages with any parameters: https://mywebsite.com/dashboard/client-*. The message will be sent on pages with the address https://mywebsite.com/dashboard/client-1234, https://mywebsite.com/dashboard/client-603826, etc.
URL with parameters: specify the page address to restrict the message from sending. This option is suitable if you need to take into account sending on pages with UTM tags.
URL containing: specify a part of the URL to restrict sending the message on several pages with the same address or address fragment at once.
💡 Who to send to

You can limit what audience receives your triggered message, as you may not want to address it to every lead who triggered it.
Configure filters
On the Audience step, select the lead segment you want to send this message to.
Basic filters
This will let you set property requirements or event requirements leads must meet before triggering the message.
Jinja filters
This setting will allow you to set the segment more accurately, taking into account not only user properties, but also event attributes.
Read more on Jinja.
Apply segment filters
This will let you set the audience using a segment you created in the Leads Database.
All filters or At least one
"All" equals logical "AND". In other words, all conditions must be met for a user to count as the audience of the triggered message.
"Any" equals logical "OR". In other words, if at least one condition is met, the lead will match the triggered message audience.
❗ Important: If a triggered message has a timeout (which you can set on the "When to send” tab), then events and properties from the “Audience” tab will be reviewed after this time period has passed.
On the left side of the tab you may see the segments you have. If you have one ready and fitting for the audience of your triggered message, you can just choose it and properties and event conditions will apply automatically.
Set a control group
The control group option is used for experimenting on how communications affect user behavior. A control group is a percentage of people who will not receive the message despite falling under the sending conditions. The leads to be excluded from the triggered message receivers are selected randomly.
Consider visitor's status at the moment of sending
If a pop-up or a chat message is sent when a user is not on your website, they will see this message next time they visit the website, which in some cases may be considered faulty automation logic. To make sure that doesn’t happen, you can send messages depending on the user status. For example, you can set a triggered message to only be sent to users with the “Online” or “Sleeping” status.
💡 Sending settings
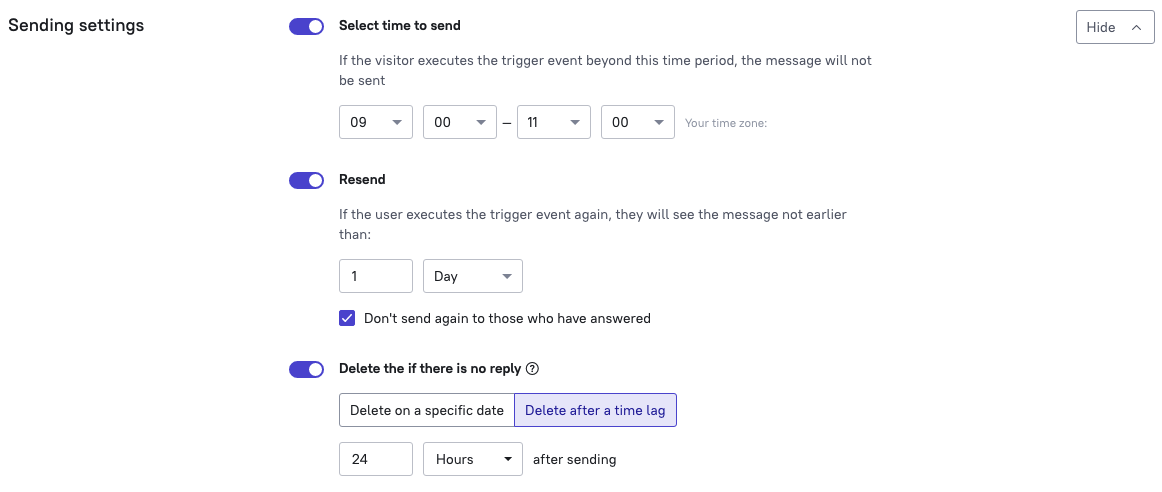
Select time to send
If the user performs a trigger event outside the set time frame, the message won't be sent.
Resend
If the user executes the trigger again and matches the audience criteria you specified in the previous step, the message will be shown to them again. With this setting, you can limit the display of the message to only once or show it no more than once in a certain period of time (for example, no more than once a day).
Also, you can stop the message from showing to users who replied to it.
Delete if there's no reply
If you launch some temporary campaign (a Christmas campaign or a notification about maintenance works on your website, for example), you can set the time to stop the message from being sent and to be deleted for users who didn't reply (clicking on a link or pressing a button in it also counts as a reply).
By default, any triggered message (except email) is set to auto-delete if the user read it but didn't respond.
If you specified the exact date for deletion, at that time the message will be deleted from chat history of all users who didn't respond to it, and the message itself will be disabled (since it's assumed that after this date the message is no longer relevant).
If a site visitor reads a pop-up, it won't appear in the chat history. If the pop-up is not read, the visitor will see a red indicator above the chat widget. After the user has viewed / read the pop-up, it will also disappear from the chat history.
A message created in the standard editor will be deleted only if there was no response to it.
❗ Please note: you can only configure this condition for pop-ups and chat messages.
💡 Data transfer and goal
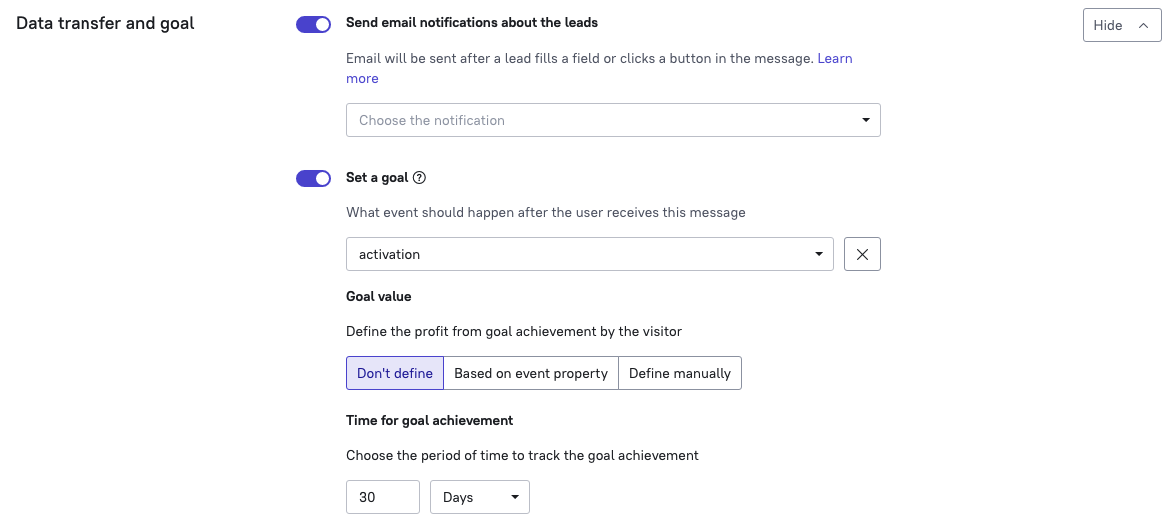
At this step, you can set up email notifications if your trigger message contains buttons or fields for entering data.
Select the goal you want to achieve with the message. Read more about goals in this article.
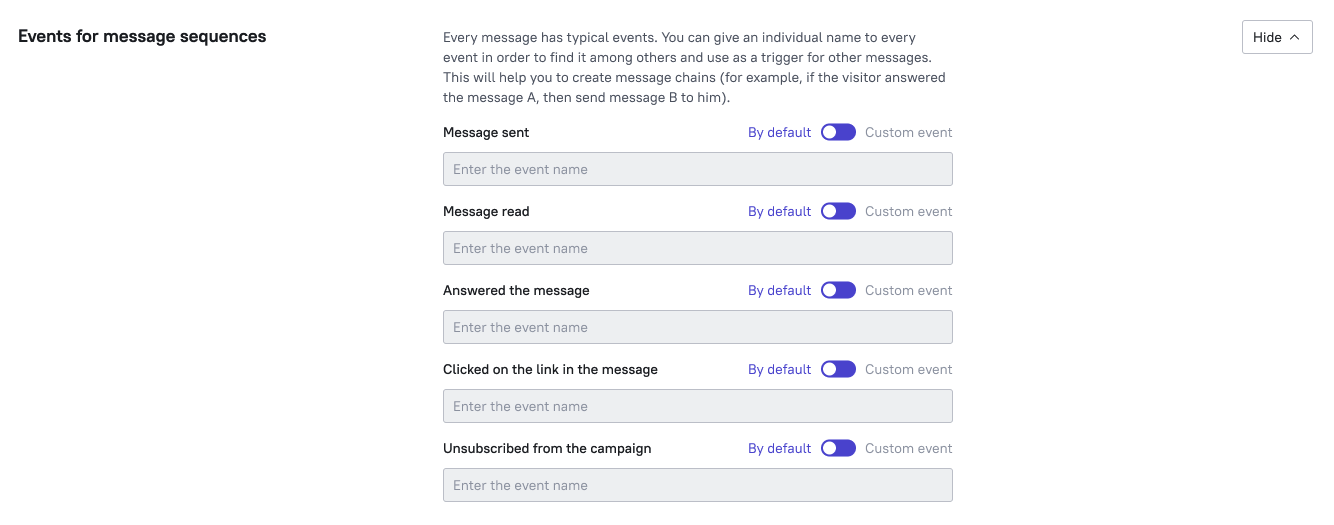
💡 Events for message sequences
To create a sequence of messages, activate custom events for preceding messages of the sequence. After that you'll be able to choose these events as a trigger for the messages that are supposed to follow.
 💡 Further actions
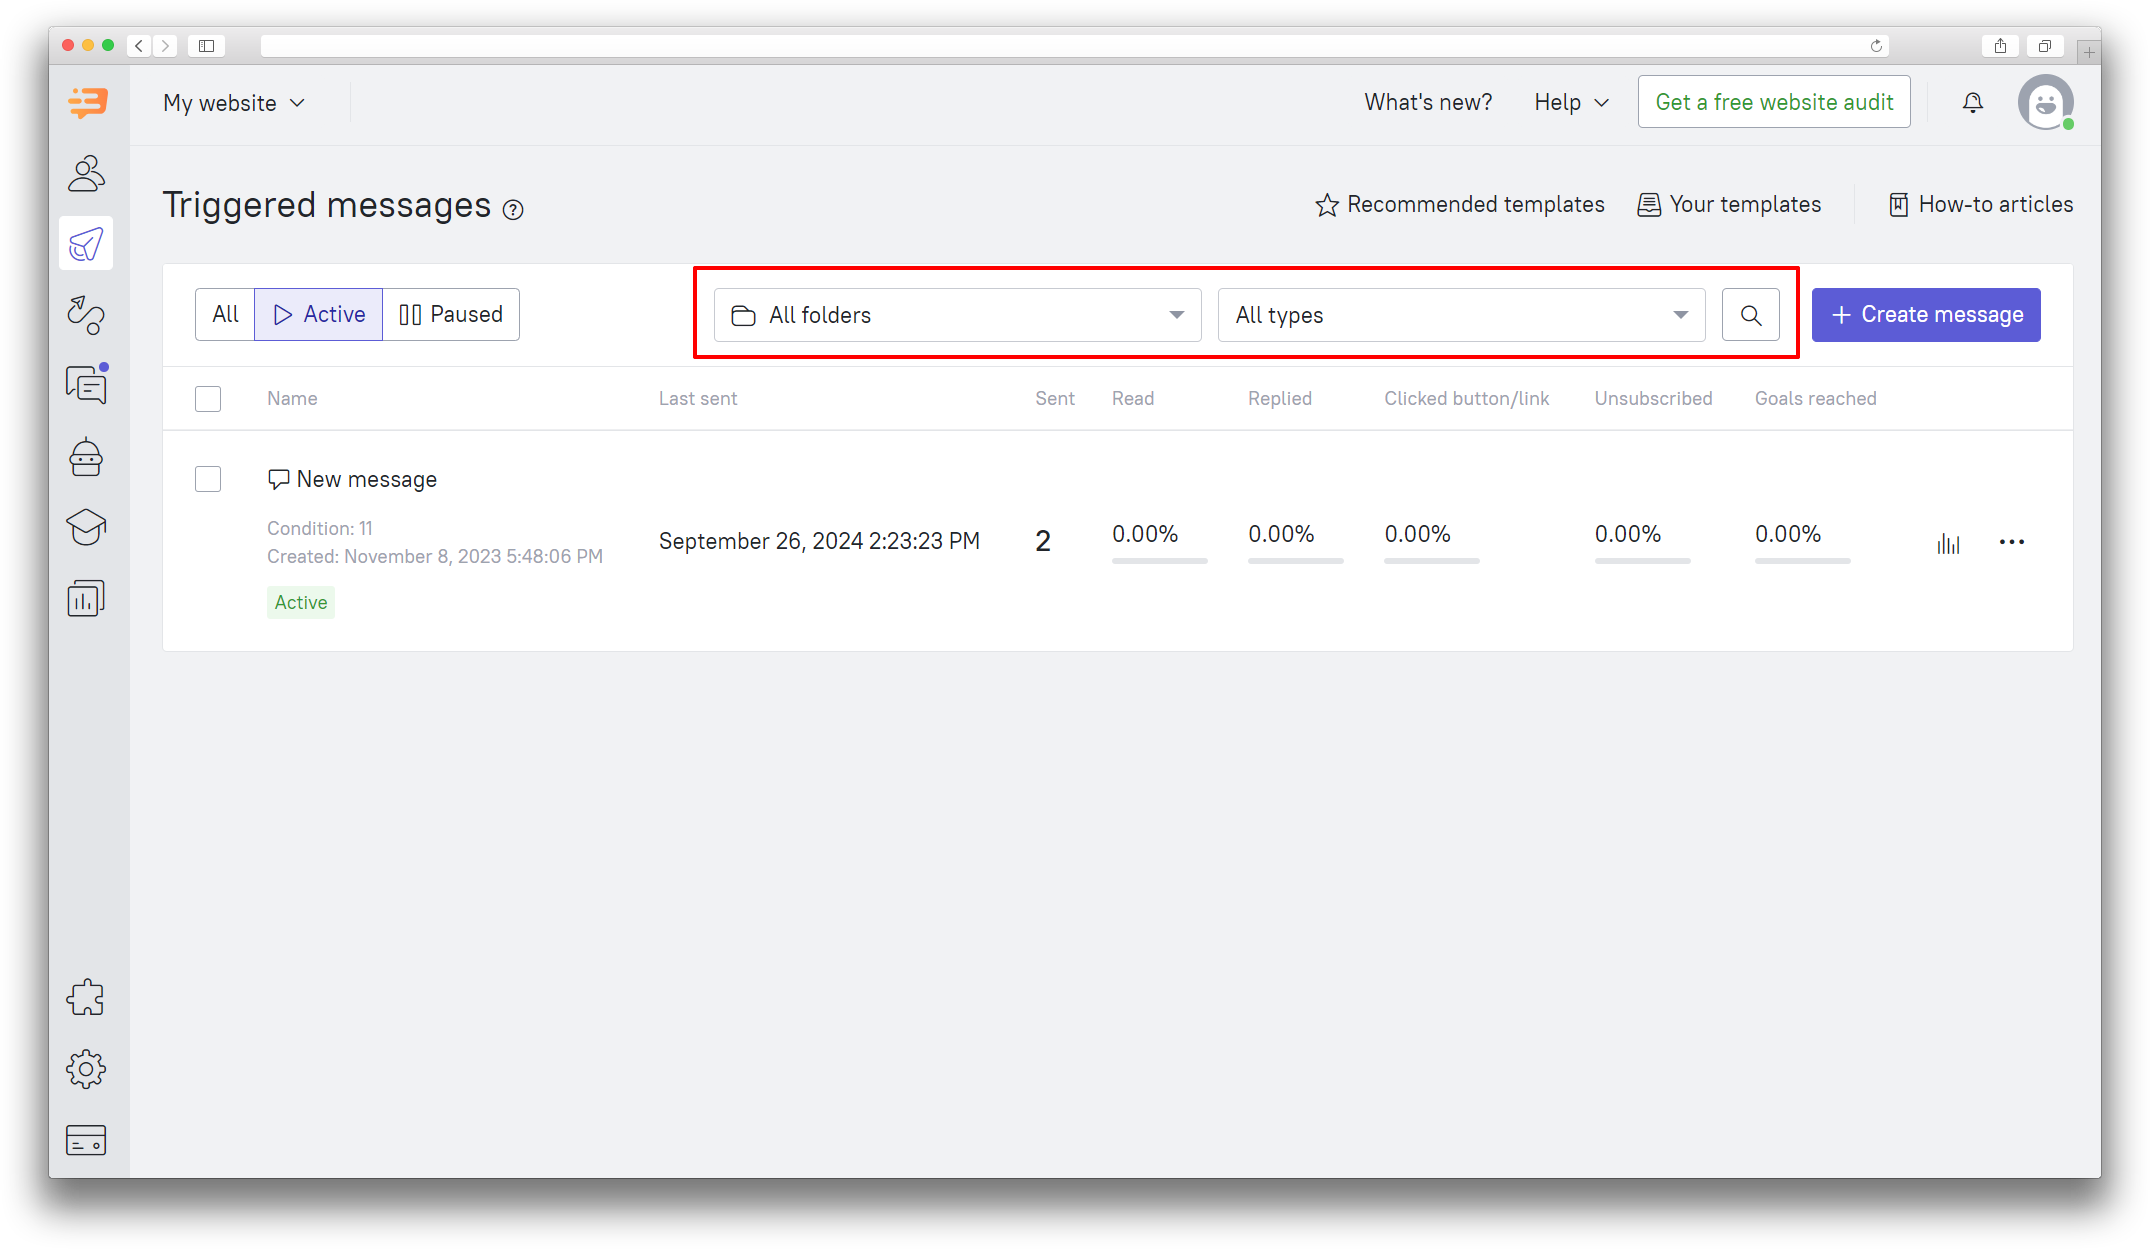
Finally, you can choose in which folder the trigger message will be located, for easier access. You can select the folder in the "Triggered messages" section.
You can also find the menu to filter the messages by type, as well as a search button, to find a message much faster.